Draw over a photo of the real location: tracing a scene image
Published: 2026-08-18
Written and reviewed by the My Traffic Sketch editorial team · How our guides are made
Templates cover the common intersections, but real scenes are stubborn: a five-way junction, a gate with a guard booth, a curved off-ramp, a lot with an odd stall pattern. For those, the fastest route to an accurate diagram is not drawing the roadway at all — it is putting an image of the actual place underneath and tracing what you need on top.
Three ways to get the image in
Open the Scene photo panel in the editor. The image can arrive by any of three routes, whichever suits the device you are holding:
- ▸Paste with Ctrl+V — fastest on a laptop. Copy a map screenshot and press Ctrl+V anywhere in the editor.
- ▸Drag the file straight onto the canvas.
- ▸Tap Upload photo and pick the image — the usual route on a phone, where it opens your camera roll.
The two controls that make tracing work
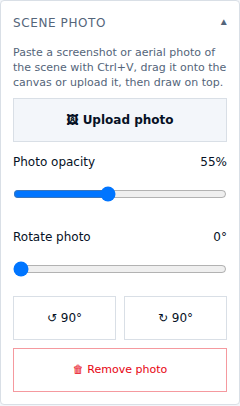
Once the image is in, two sliders in the same panel do the real work. Photo opacity runs from 20% to 100%; drop it to roughly half and the photo becomes a guide you can see through rather than a background competing with your drawing. The example above sits at 55%.
Rotate photo turns the image from 0 to 359 degrees, with quick ±90° buttons beside it. Use it so the roadway runs the way you want it on the page — then set the north arrow to match the real bearing, which is what actually orients the reader.
One thing to know: the photo replaces the road template. That is the point — you are no longer approximating the layout, you are drawing on the layout. Remove the photo and the templates come back, with everything you drew still in place.
A worked example: a side street with no matching template
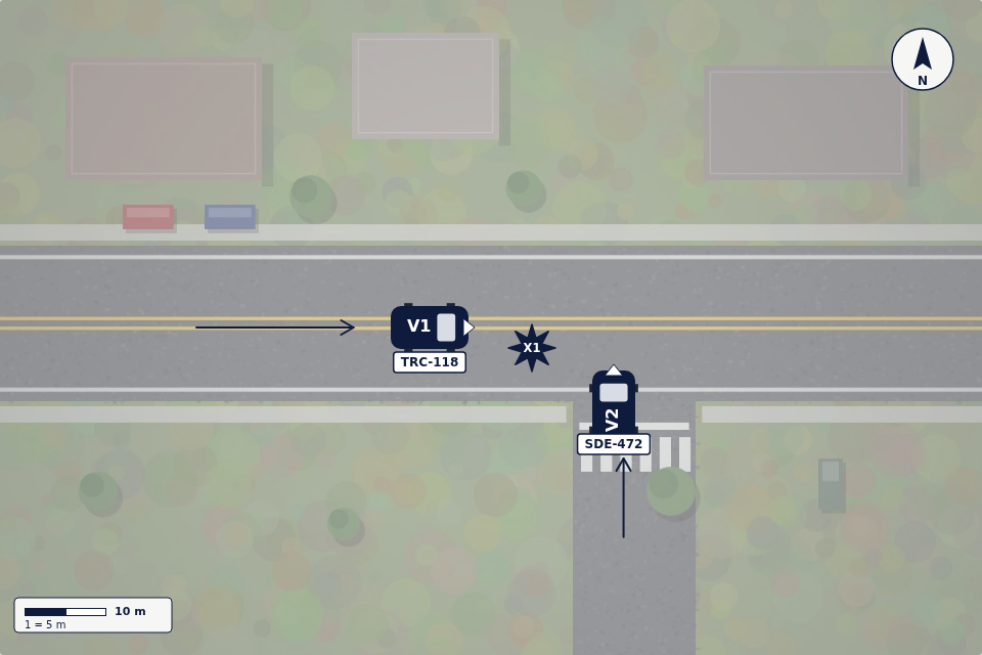
The diagram above traces an overhead image of a location. V1 (TRC-118) travels east on the main road; V2 (SDE-472) pulls out of the side street across the crosswalk and into V1's path. Impact point X1 sits between them. (The underlying image here is a sample overhead view, not a real place, and all plates and positions are fictional.)
Notice what the photo contributes that a template could not: the real width of the roadway, the exact position of the crosswalk and stop bar, the driveway offsets, the buildings that shaped the sight lines, and the parked cars along the verge. None of that had to be drawn or estimated — it was already in the picture. Only four elements were added on top: two vehicles with plates, two travel arrows and the impact point.
Keeping the drawing readable over the image
A traced diagram fails in one specific way: the markings disappear into the photo. Three habits prevent it.
- ▸Dim the photo before you draw, not after. At 50–60% the drawing stays the brightest thing on the page.
- ▸Over dark asphalt or a night image, switch the element colour to white — it is in the palette for exactly this reason.
- ▸Draw less. On a photo the context is already there, so adding cones, signs and labels the picture already shows only buries the parts that matter.
Measurements still come from the scene
This is the part worth being strict about. A photo makes positions look precise, and that precision is an illusion: image scale varies with the source, the zoom and the camera angle, so a distance eyeballed off a picture is an estimate wearing a disguise.
Measure on the ground with a tape or wheel, then record those numbers on the diagram. Set the grid scale so the drawing is consistent with them, and label paced estimates as estimates. The photo gives you geometry — where things are relative to each other; the tape gives you distance. Do not let one impersonate the other.
What to use as the source image
An aerial or satellite view of the address is the usual choice, and a screenshot of one works fine. Check the imagery is current enough to match the scene — lane configurations and lot layouts change, and an outdated view can quietly contradict your diagram.
Your own overhead photo works too, and sometimes better: taken from an upper floor, a parking deck, or simply held high, it shows the scene as it was that day, including the conditions and any temporary obstruction. Whatever the source, respect the terms of the imagery you use, and remember your draft never leaves your device — the photo is embedded in the local draft in your browser, and the finished export is yours to file.
Ready to draw your own diagram? The editor is free and needs no account.
Open the free sketch tool