Intersection accident diagram: a worked example
Published: 2026-08-07
Written and reviewed by the My Traffic Sketch editorial team · How our guides are made
Intersections concentrate the hardest diagram problems: multiple approaches, turning paths, signals and right-of-way. This worked example — drawn entirely with the free editor — shows a typical failure-to-yield collision and why each element is where it is.
The scenario
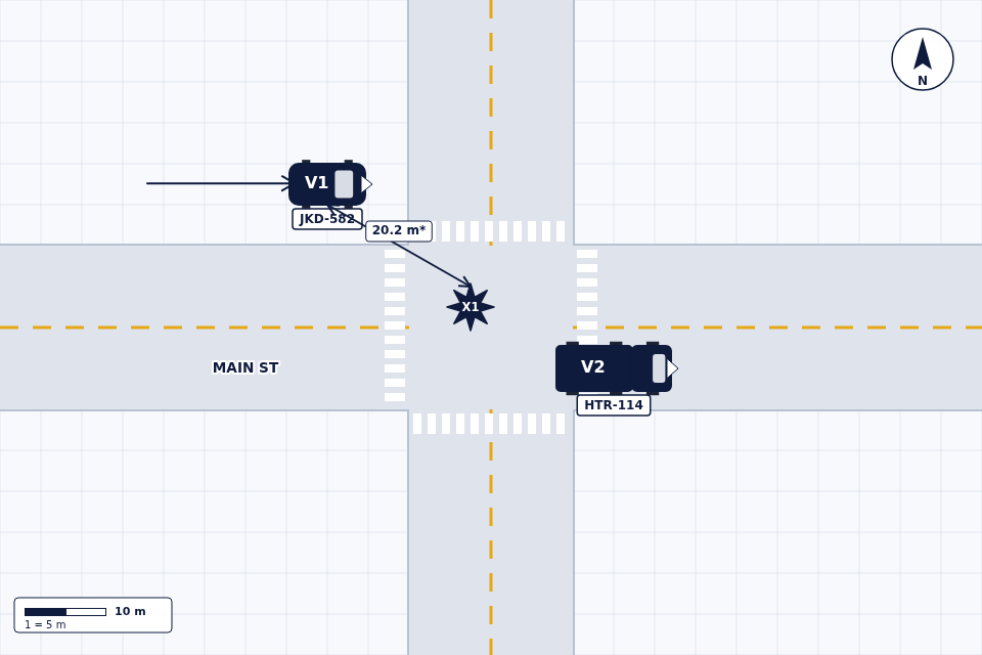
V1 (car, plate JKD-582) approaches the four-way intersection from the west. V2 (delivery truck, plate HTR-114) travels through the intersection. V1 enters and strikes V2 — the impact point X1 sits where their paths cross, not on either vehicle.
The plates and the scenario are invented for the example, and every distance in it is illustrative: the point is the method, which works the same when the facts are yours.
What makes this diagram readable
Look at the example and notice:
- ▸The 4-way template supplies crosswalks and lane markings for free. Context nobody had to draw.
- ▸V1's arrow starts behind the vehicle and traces its approach; the measurement (20 m) records the distance from V1's position to the impact.
- ▸X1 is its own symbol at the crossing point of the paths, so "where did they hit?" needs no interpretation.
- ▸The street name runs along the road like on a map, and the compass pins the orientation.
- ▸The plates print under each vehicle, and again in the export's vehicle table.
The measurements worth taking at an intersection
Intersections have a gift most scenes lack: fixed reference points everywhere. Stop lines, crosswalk edges and curb corners survive long after the vehicles are towed, so anchor your distances to them. Useful dimension lines for a collision like this one (values illustrative):
- ▸From each vehicle's rest position to the nearest curb corner or stop line — e.g., V1's front axle approx. 4 m past the westbound stop line.
- ▸From the impact point X1 to a fixed corner: this locates the collision even if the rest positions are disputed.
- ▸Lane width where it matters. A truck turning out of a 3.2 m lane is a different story than out of a 4.5 m lane.
- ▸Any skid or gouge, measured from where it begins to where it ends.
Reading the finished diagram
Cover the narrative and the example still answers the load-bearing questions: V1 was westbound-to-east through the intersection, V2 was crossing its path, they met at X1 about 20 m from V1's marked approach position, the movement was governed by the controls shown at the corners, and north is where the compass says. The narrative then adds only what a picture cannot: signal state as reported by each driver, weather, light, and what each said they intended.
That division of labor — geometry in the drawing, sequence and conditions in the text — is what keeps an intersection diagram from becoming a tangle of annotations.
Variations you can build from the same base
The same five-element pattern (template, two vehicles, arrows, X1, one measurement) adapts to the other classic intersection collisions: a left-turn-across-path collision puts a curved arrow on the turning vehicle and X1 in front of the oncoming lane; a right-angle collision at a stop sign replaces the signal with the sign symbol and usually deserves a sight-line measurement from the stop line; a T-junction case starts from the T template instead. None of them require more elements: only different placement.
Draw this yourself in about five minutes
Open the editor, choose the 4-way crossing template, place two vehicles, rotate V1 toward the intersection, add one arrow each, drop the impact marker where the paths cross, add one measurement and a street name. Export the PDF — the header, vehicle table and legend are added automatically.
Ready to draw your own diagram? The editor is free and needs no account.
Open the free sketch tool